espos összes bejegyzése

UPDATE

NAPI TANÍTÁS
A világ a színfalak mögött
Dr Lobsang Rampa művei

LAST UPDATE: 2024. 04. 04.
VERSION:  v482

+ Update Android app
+ Update IDIP
+ Add IDIP HTTPS server (only Lite firmware!)

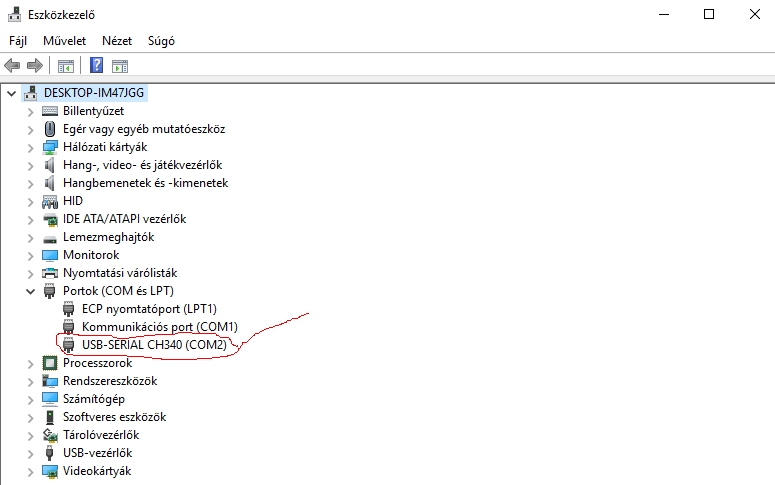
+ Add fake CH340 chip driver fixer
– a lot of Bug Fixes

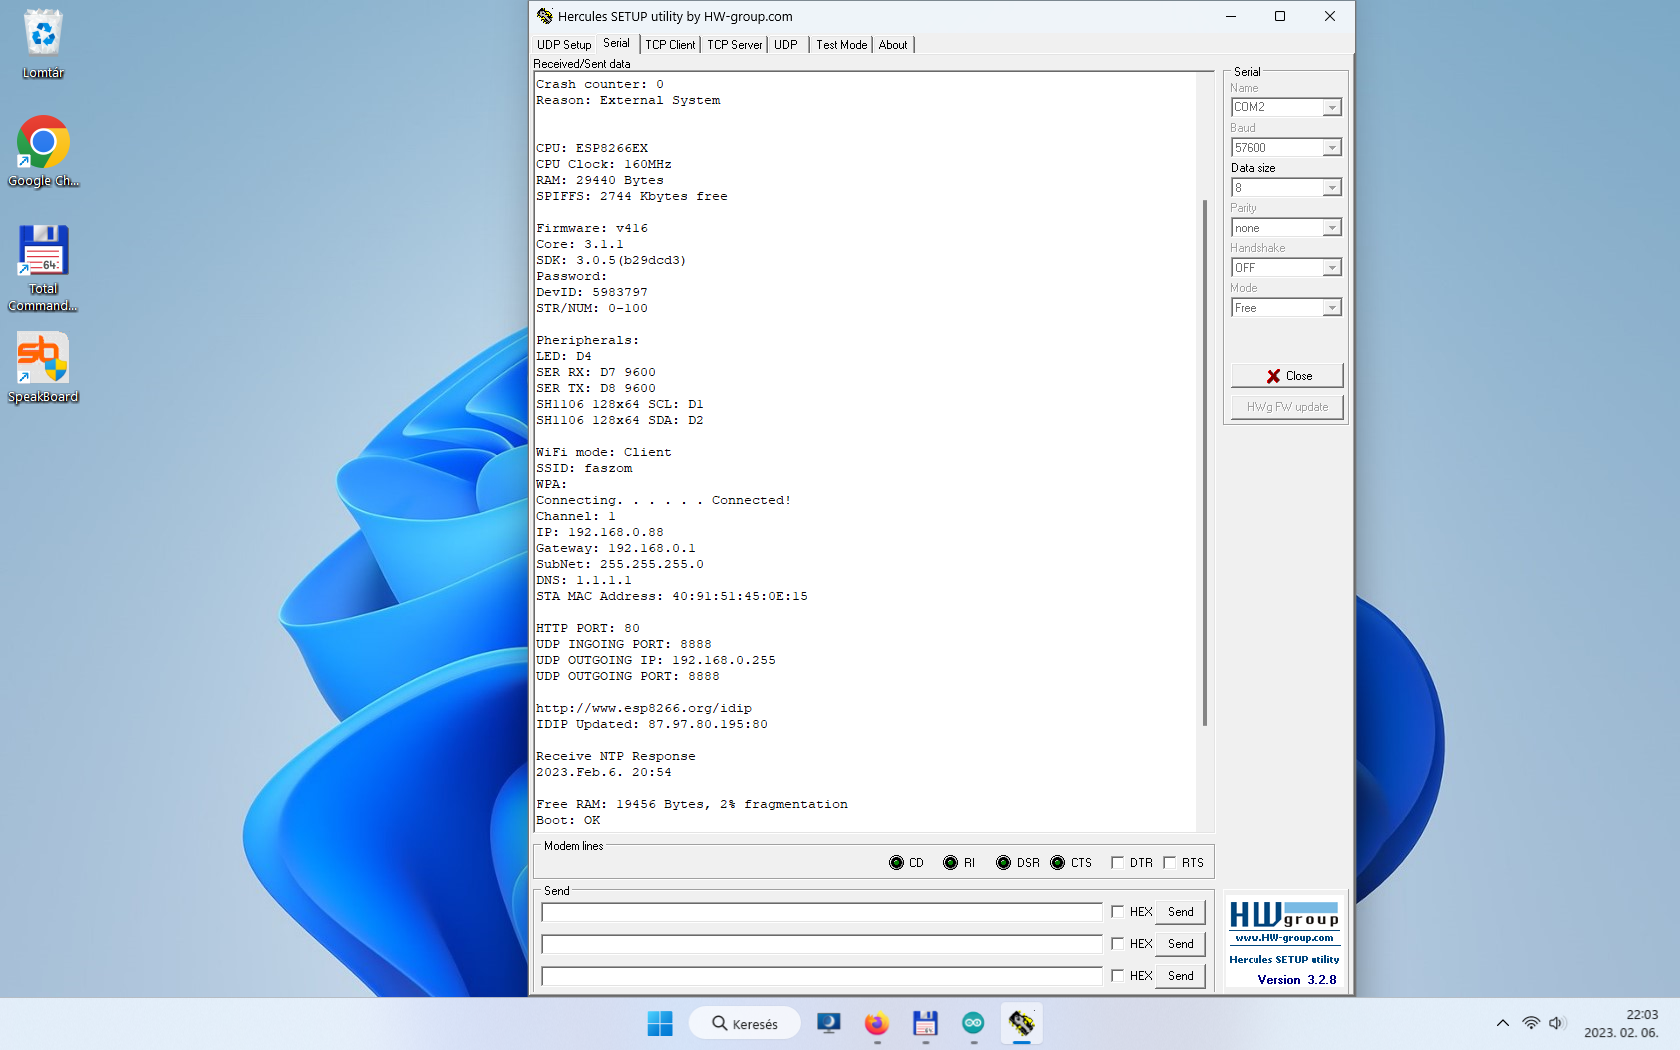
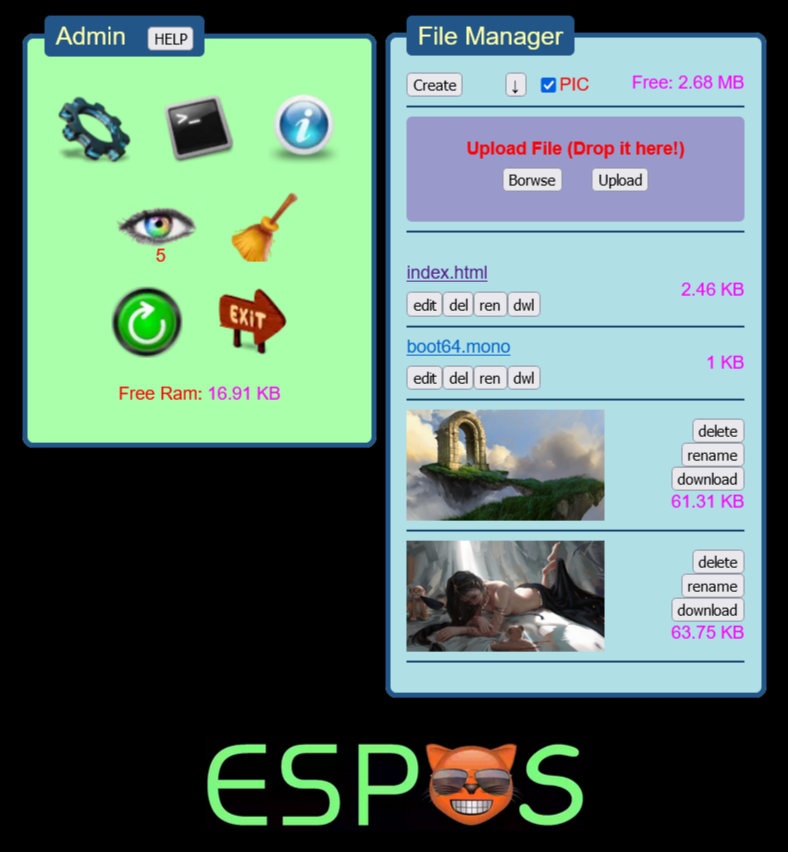
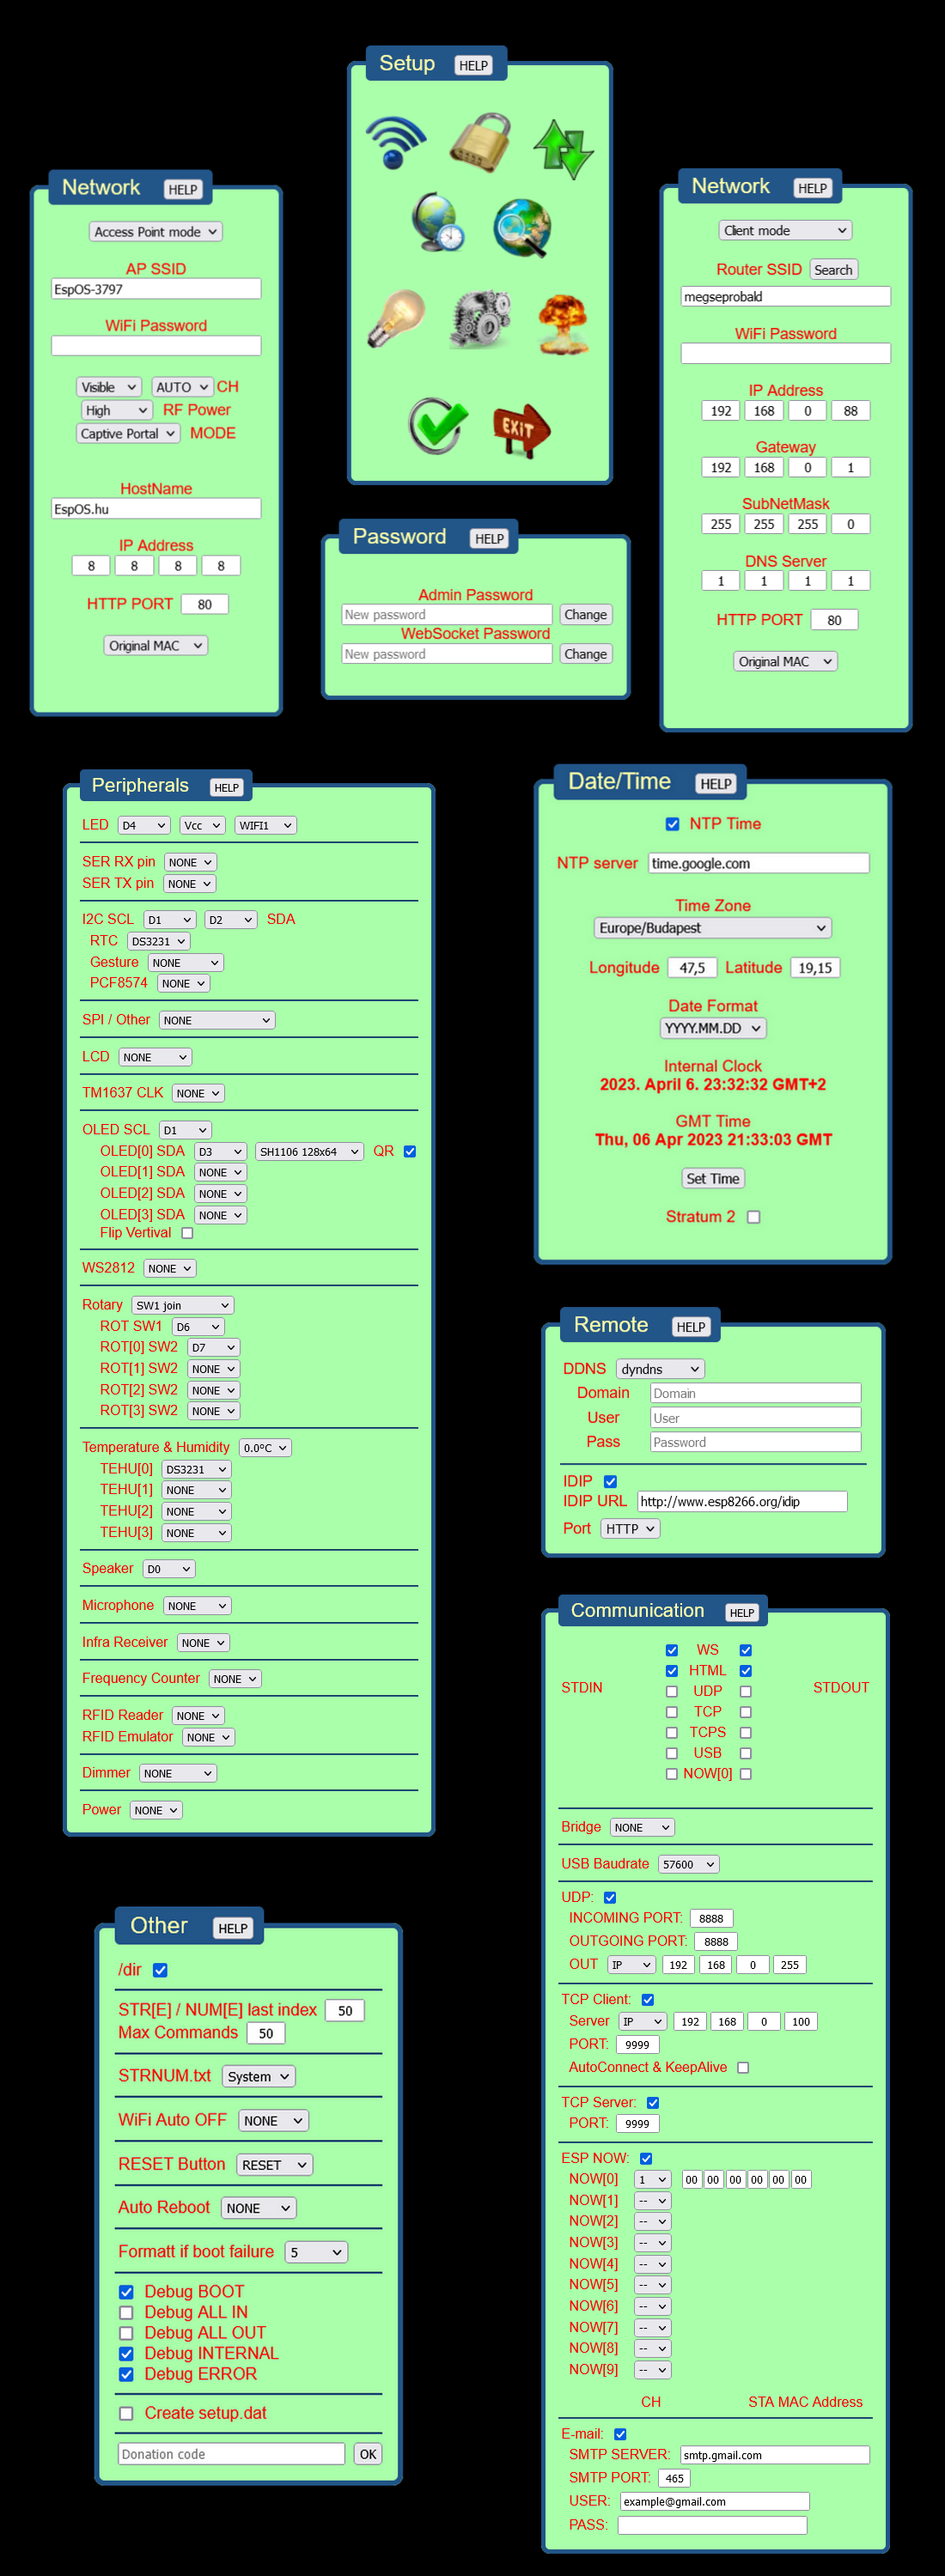
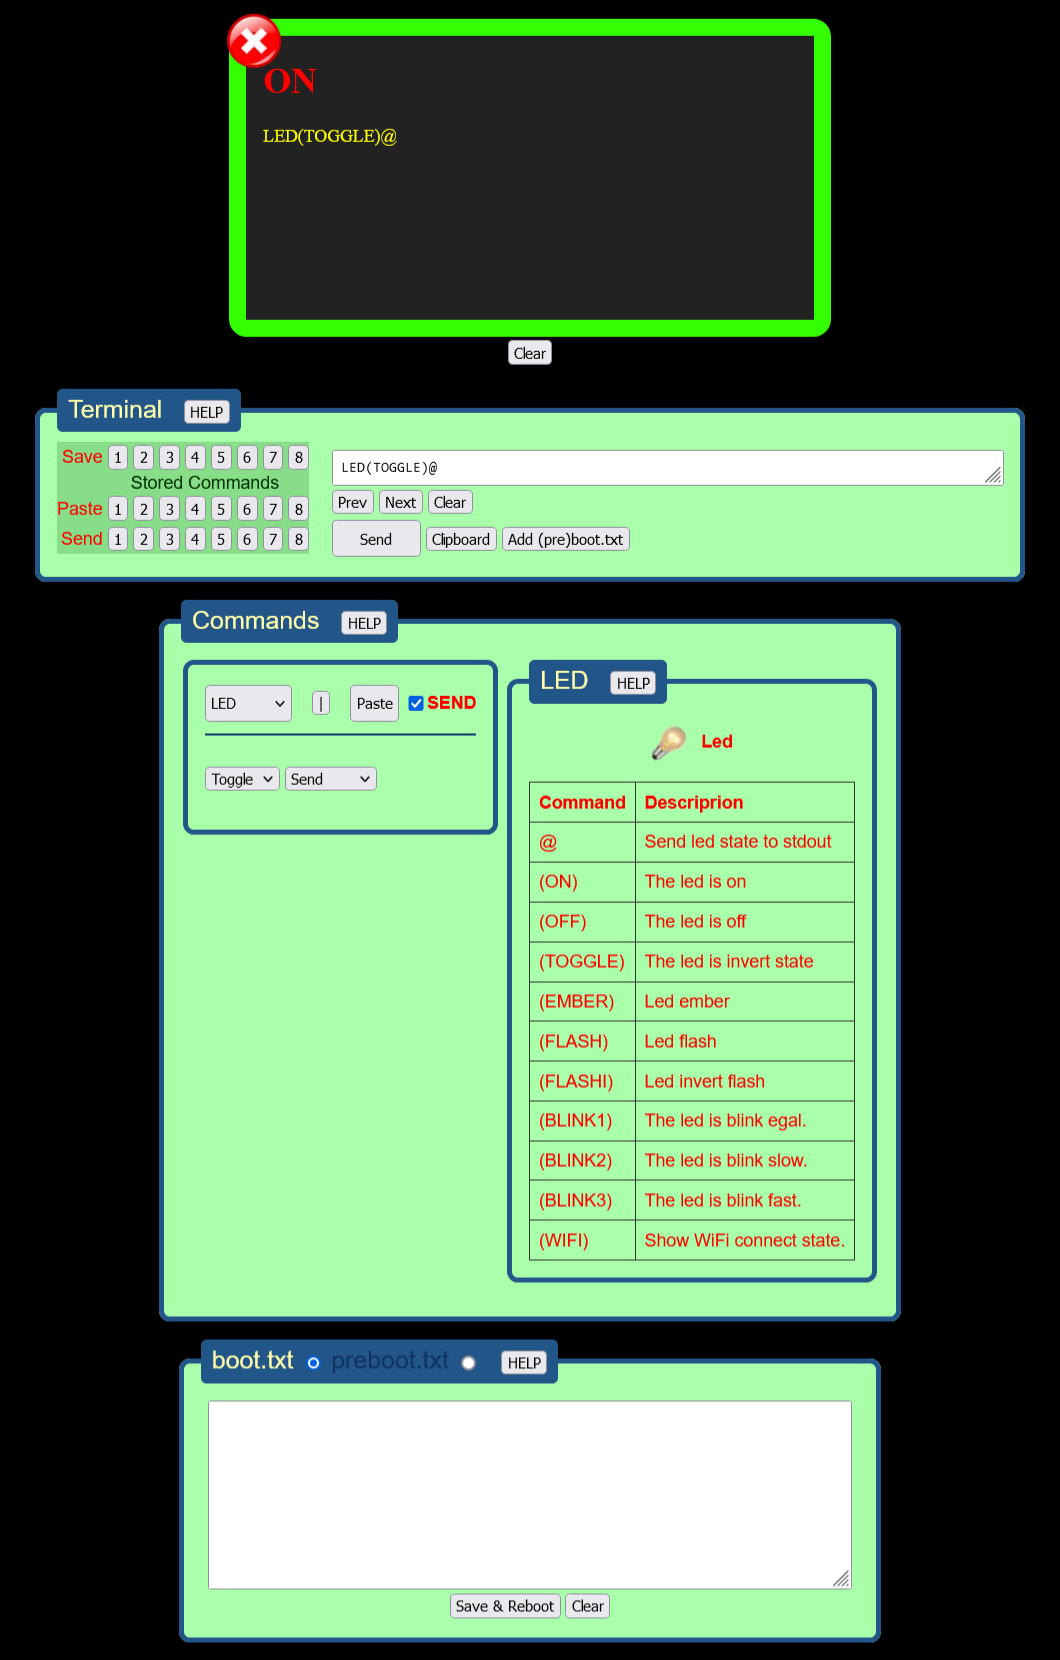
It has happened, what I was afraid of: the RAM is starting to deplete. This can be addressed by switching to an ESP32 processor. I will still create the planned peripherals for the ESP8266 module and try to optimize the code. In the meantime, I am bridging the problem with Lite versions where I remove certain functionalities that are not essential for a specific task. For example, Lite1 was created because 4 OLED displays couldn’t work simultaneously, so I removed the LED strip and the IR remote control, which have no relevance to a display project. The system becomes unstable when the free RAM drops below ~8kB, which can be checked using the „RAM@” command. In the future, I plan to create an ESP32C3-based board (for sale) with a power supply, terminal blocks, relays, and GPIO connectors.

Bekövetkezett, amitől féltem: kezd fogyni a RAM. Ezt ESP32 procira váltással lehet orvosolni. A tervezett perifériákat még megcsinálom ESP8266 modulra, próbálom optimalizálni a kódot. Addig is Lite verziókkal hidalom át a problémát, több verzió lesz, mindegyikből kiveszek valamit, ami az adott feladathoz nem hiányzik. A Lite1 például azért készült, mert 4db OLED kijelző nem működött egyszerre, ezért kiszedtem a ledszalagot, infra távirányítót, aminek semmi köze egy display projekthez. ~8kB alatt instabil lesz a rendszer.  A RAM@ paranccsal ellenőrizhető a szabad ram. Tervezek a későbbiekben egy ESP32C3 procis panelt készíteni (eladásra) tápegységgel, sorkapcsokkal, relével, GPIO csatlakozókkal.

LITE:  FREQ TM1637 LCD STRIP IR RFID MIC EXTIO DIMM GEST PROX LIGHT

EspOS

Did you know that this is a WiFi web server? Or perhaps a microcontroller with a ridiculously simple script as its program? Or maybe both? And all this for around $5. Apart from a micro USB charger, you don’t need anything else.

Gondoltad volna hogy ez egy WiFi webszerver?  Vagy esetleg egy mikrokontroller, aminek egy faék egyszerű szkript a programja?  Vagy mind a kettő? Mindez 5$ körüli áron.  Egy micro USB-s telefontöltőn kívül másra nincs is szükség hozzá.
That’s almost true. The only thing missing is a good firmware. Out of the box, these modules are not usable for the average user. There are many firmware options available online, but most of them are unusable, some are fun to play with but not useful for anything else. There are a few well-done ones that require significant expertise and a pilot’s license to control your smart home. I searched a lot, but I couldn’t find a truly usable one, so I decided to create my own. That’s how EspOS came to be. It has a web-based admin interface and a file manager. The module has approximately 3MB of internal storage where you can upload the web page you want to share. Unfortunately, it cannot run PHP, so I created a command interpreter. It has 9 digital and 1 analog pin that can be controlled with commands, and their status can be queried. You can also connect peripherals to them. No cloud services are supported, and neither is the MQTT protocol, which would require a broker that is not necessary for a simple task and is likely not available anyway. These will not be supported in the future either because that’s what Tasmota and ESPEasy firmware are for. They are designed specifically for these needs. This firmware is a local solution, for example, for a door opener that uses an NFC card or a code entered into an input field on a web page. The index.html is the web page that you need to create, and it requires minimal knowledge of HTML, CSS, and JavaScript. It’s not complicated, you can learn it at https://www.w3schools.com. That’s where I started too.

Ez így majdnem igaz. Hiányzik még egy jó firmware. Ezek a modulok gyárilag átlag felhasználó számára nem használhatók semmire. Sok firmware található hozzá a neten. Sok használhatatlan közülük, sok játszani jó, másra nem igazán. Van pár nagyon jól sikerült, amihez komoly előképzettség szükséges, pilótavizsgával okos-otthon vezérlést lehet vele csinálni. Sokat keresgéltem, de egy igazán jól használhatót se találtam, ezért döntöttem úgy, hogy készítek egyet. Ez lett az EspOS. Van webes admin felülete, fájlkezelője. A modul belső tárhelye ~3MB. Ide lehet feltölteni a megosztani kívánt weblapot. PHP-t sajnos nem tud futtatni, ezért készítettem egy parancsértelmezőt. Van 9 digitális, 1 analóg lába, ami parancsokkal vezérelhető, állapotuk lekérdezhető, perifériák köthetők rá. Semmilyen felhő szolgáltatás nem támogatott. MQTT protokoll se, ehhez kell egy broker, ami egy egyszerű feladat megoldásához nem szükséges, nagy valószínűséggel nem is áll rendelkezésre. Ezek a jövőben se lesznek támogatva, erre van a Tasmota , ESPEasy firmware, ami maximálisan ezekre az igényekre készült. Ez a firmware helyi cucc, például egy ajtónyitó, ami NFC kártyával nyitja az ajtót, vagy egy weblap input mezőjébe beírt kóddal. Ez a weblap az index.html, amit neked kell elkészíteni, ehhez minimális HTML-CSS-JavaScript ismeret szükséges. Nem bonyolult, https://www.w3schools.com, én is itt kezdtem.

INSTALL

By clicking on the DOWNLOAD button in the top right corner, you can download the firmware along with the necessary files. Unpack the espos.zip file to a desired location. The firmware is designed for the WeMos D1 Mini board, but it should work on any device equipped with an ESP12 module. I haven’t tested it on other devices. Additionally, for Windows, the CH341SER driver needs to be installed. It is included in the unpacked package. This should provide us with a virtual COM port.

Jobb felső sarokban a DOWNLOAD-ra kattintva letölthető a firmware a szükséges egyéb dolgokkal együtt. Csomagold ki az espos.zip fájlt valahova. WeMos D1 mini panelra készült a firmware, de valószínű minden ESP12 modullal szerelt eszközön működik. Máson nem próbáltam. Még… Ennek megfelelően a CH341SER drivert kell telepíteni Windows alá. Benne van a kicsomagolt cuccban. Elvileg kaptunk egy virtual COM portot.

You can now start the Flash_firmware.exe program. Select the EspOS_vxxx.bin (xxx = version number) file, choose the COM port, and click on the Flash button.

Most lehet indítani a Flash_firmware.exe programot. EspOS_vxxx.bin (xxx=verziószám) kiválaszt, COM port kiválaszt, mehet a Flash gomb.

Once the progress reaches 100%, after a short while, the LED will light up, indicating the formatting of the storage. Then it will start flashing, indicating the boot process. Once it goes into sleep mode, it is ready for use.

The hercules_3-2-8.exe tool can be used to monitor events. The COM port speed is set to 57600 baud, and it can be run after the flash reaches 100%. It can also be used to test the UDP channel. Finally, I have found a usable terminal.

Ha végigment a százalék, utána kis idő múlva kigyullad a led, ez jelzi a tárhely formattálását. Utána villog, ez a boot folyamat. Ha elaludt, használatra kész.

A hercules_3-2-8.exe segítségével figyelhetők az események. COM port sebessége 57600 baud, a flash 100% után szabad futtatni. UDP csatorna is tesztelhető vele. Végre egy használható terminált sikerült találnom.

Hercules SETUP utility

After installation, the device starts in Access Point mode, creating a Wi-Fi network called „EspOS.” Connect to this network using any Wi-Fi-enabled device. By default, the Captive Portal mode is enabled, which displays a login message when connected to the network. Clicking on it will take you to the index.html webpage. The „Give me money” annoying message can be removed with a small donation. There are no other restrictions, and the firmware is fully functional without any donations. If you don’t see the login message, you can enter the IP address „8.8.8.8” in the browser’s address bar to access the index.html page. To access the admin menu, go to IP/login (e.g., 8.8.8.8/login). The factory index.html page contains a login button. There is no password (just press enter).

Telepítés után AccessPoint módban indul a kütyü. Létrehoz egy EspOS nevű wifi hálózatot. Csatlakozzunk rá valami wifi képes eszközzel. Gyári beállításban be van kapcsolva a CaptivePortal mód, ilyenkor az eszköz feldob valami bejelentkezés a hálózatba üzenetet, rá kattintva az index.html weboldalon vagyunk. Az adjál pénzt bosszantó üzenet egy kis támogatással eltüntethető. Egyéb korlátozás nincs, teljes értékű a firmware adakozás nélkül is. Ha esetleg nem kapunk bejelentkezés üzenetet, a böngésző címsorába írva a 8.8.8.8 IP címet, megkapjuk az index.html-t. Belépés az admin menübe: IP/login (8.8.8.8/login). A gyári index.html oldalon van login gomb. Jelszó nincs (enter).


Terminal

It does not include the firmware. To use it, you need to upload the plugins/TERMINAL_xx.tar file from the installer folder, after which it will appear in the admin menu.

Nem tartalmazza a firmware. Használatához a telepítő mappából a plugins/TERMINAL_xx.tar fájlt fel kell tölteni, ezután jelenik meg az admin menüben.

Terminal   Commands   boot.txt

Peripherals


Supported:

-LED
-Speaker
-Serial Port
-TM1637 7 segment display
-SSD1306, SSH1106 OLED display
-HD44780 LCD display
-WS2812 LED strip
-Rotary Encoder
-Potentiometer
-DS18xXX temperature, sensor
-DHT11 / DHT22 temperature, humidity sensor
-DS3231, DS1302, DS1307 RTC clock
-IR receiver
-MFRC522 NFC reader
-RDM6300 RFID reader
-125kHz RFID TAG emulator
-INMP441 digital microphone
-PCF8574 I/O extender
-AC dimmer
-APDS9960 gesture / proximity / light / color sensor


Coming Soon:

-LoRa radio
-IR transmitter
-SIM800L GSM module

REMOTE ACCESS

How do I turn on the air conditioner remotely?

Click on the „MyDevice” button in the upper right corner. Enter the DeviceID here (found in Admin/Info), and the air conditioner will start working. Its functionality is handled by the „idip” library, which is available on www.esp8266.org in the root directory. This is already set up by default in the Setup menu. The installer package includes it and can be uploaded to any PHP-enabled hosting. In the Setup menu, you can enter „idip” in the appropriate field, for example: http://tarhelyem.hu/idip. The OS retrieves the public IP using „myip.php” and saves it to the storage associated with the module’s DeviceID using „saveip.php”. The „devip.php” is used for the Android application. There are no tricks; it can be verified using the WireShark program. The HTTP port and/or the UDP port need to be opened in the router to make the module accessible.


Hogy kapcsolom be hazafelé a légkondit?

Jobb felső sarokban klikk a MyDevice gombra. Ide bepötyög a DeviceID, (Admin/Info) és máris teszi a dolgát a légkondi. Működése: Az idip könyvtár felelős ezért. Ez van fent az www.esp8266.org oldalon is a root mappában. Setup menüben ez van alapértelmezetten megadva. A telepítő csomagban benne is van, ez bármilyen PHP képes tárhelyre feltölthető, Setup menüben az idip sorba beírni pl: http://tarhelyem.hu/idip. Az OS a myip.php segítségével lekéri a public IP-t, a saveip.php meg elmenti a tárhelyre a modul DeviceID számával társítva. A devip.php az Android alkalmazáshoz kell. Turpiszság nincs, WireShark programmal ellenőrizhető. Routerban a HTTP portot, és/vagy az UDP portot ki kell nyitni, hogy elérhető legyen a modul.

Android APP


You can download it by clicking here on your phone. You need to allow installation from unknown sources. It will soon be available on the Google Play Store as well. The installer APK is included in the downloadable package. To access IDIP, you need to open the HTTP port on your router, and the DeviceID can be found in the admin menu’s Info panel.

Telefonnal Ide kattintva tölthető le. Az ismeretlen forrásból való telepítést engedélyezni kell. Hamarosan Google Play áruházból is elérhető lesz. Benne van a letölthető csomagban a telepítő apk. IDIP eléréshez a HTTP portot ki kell nyitni a routeren, a DeviceID az admin menü Info paneljén található.