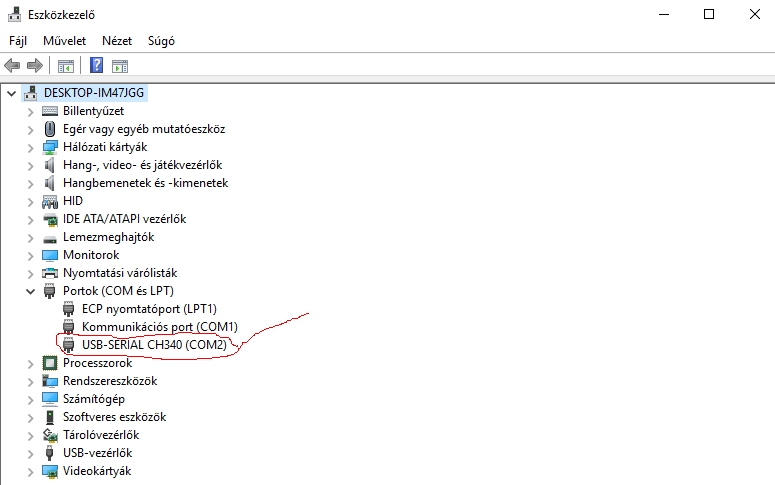
By clicking on the DOWNLOAD button in the top right corner, you can download the firmware along with the necessary files. Unpack the espos.zip file to a desired location. The firmware is designed for the WeMos D1 Mini board, but it should work on any device equipped with an ESP12 module. I haven’t tested it on other devices. Additionally, for Windows, the CH341SER driver needs to be installed. It is included in the unpacked package. This should provide us with a virtual COM port.
Jobb felső sarokban a DOWNLOAD-ra kattintva letölthető a firmware a szükséges egyéb dolgokkal együtt. Csomagold ki az espos.zip fájlt valahova. WeMos D1 mini panelra készült a firmware, de valószínű minden ESP12 modullal szerelt eszközön működik. Máson nem próbáltam. Még… Ennek megfelelően a CH341SER drivert kell telepíteni Windows alá. Benne van a kicsomagolt cuccban. Elvileg kaptunk egy virtual COM portot.
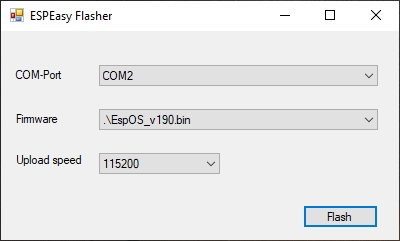
You can now start the Flash_firmware.exe program. Select the EspOS_vxxx.bin (xxx = version number) file, choose the COM port, and click on the Flash button.
Most lehet indítani a Flash_firmware.exe programot. EspOS_vxxx.bin (xxx=verziószám) kiválaszt, COM port kiválaszt, mehet a Flash gomb.
Once the progress reaches 100%, after a short while, the LED will light up, indicating the formatting of the storage. Then it will start flashing, indicating the boot process. Once it goes into sleep mode, it is ready for use.
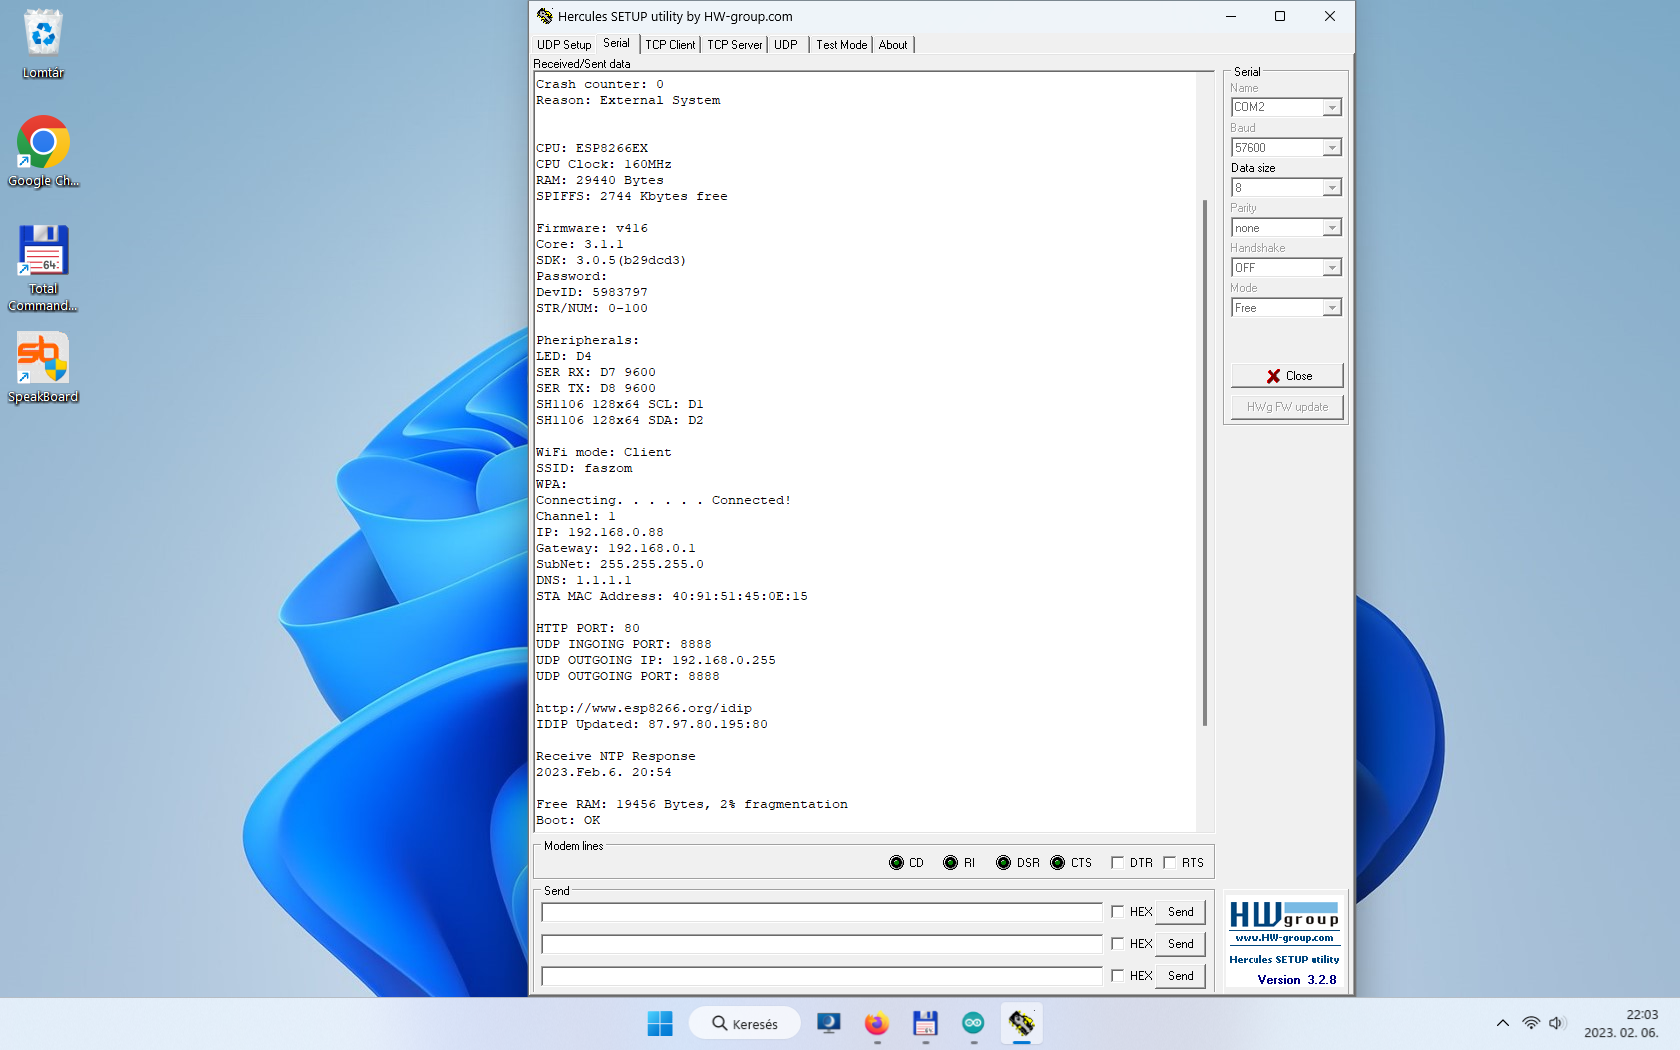
The hercules_3-2-8.exe tool can be used to monitor events. The COM port speed is set to 57600 baud, and it can be run after the flash reaches 100%. It can also be used to test the UDP channel. Finally, I have found a usable terminal.
Ha végigment a százalék, utána kis idő múlva kigyullad a led, ez jelzi a tárhely formattálását. Utána villog, ez a boot folyamat. Ha elaludt, használatra kész.
A hercules_3-2-8.exe segítségével figyelhetők az események. COM port sebessége 57600 baud, a flash 100% után szabad futtatni. UDP csatorna is tesztelhető vele. Végre egy használható terminált sikerült találnom.
After installation, the device starts in Access Point mode, creating a Wi-Fi network called „EspOS.” Connect to this network using any Wi-Fi-enabled device. By default, the Captive Portal mode is enabled, which displays a login message when connected to the network. Clicking on it will take you to the index.html webpage. The „Give me money” annoying message can be removed with a small donation. There are no other restrictions, and the firmware is fully functional without any donations. If you don’t see the login message, you can enter the IP address „8.8.8.8” in the browser’s address bar to access the index.html page. To access the admin menu, go to IP/login (e.g., 8.8.8.8/login). The factory index.html page contains a login button. There is no password (just press enter).
Telepítés után AccessPoint módban indul a kütyü. Létrehoz egy EspOS nevű wifi hálózatot. Csatlakozzunk rá valami wifi képes eszközzel. Gyári beállításban be van kapcsolva a CaptivePortal mód, ilyenkor az eszköz feldob valami bejelentkezés a hálózatba üzenetet, rá kattintva az index.html weboldalon vagyunk. Az adjál pénzt bosszantó üzenet egy kis támogatással eltüntethető. Egyéb korlátozás nincs, teljes értékű a firmware adakozás nélkül is. Ha esetleg nem kapunk bejelentkezés üzenetet, a böngésző címsorába írva a 8.8.8.8 IP címet, megkapjuk az index.html-t. Belépés az admin menübe: IP/login (8.8.8.8/login). A gyári index.html oldalon van login gomb. Jelszó nincs (enter).